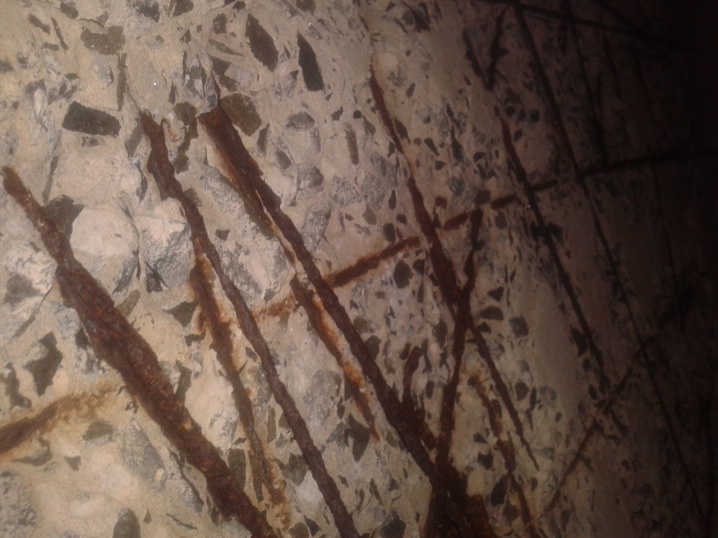
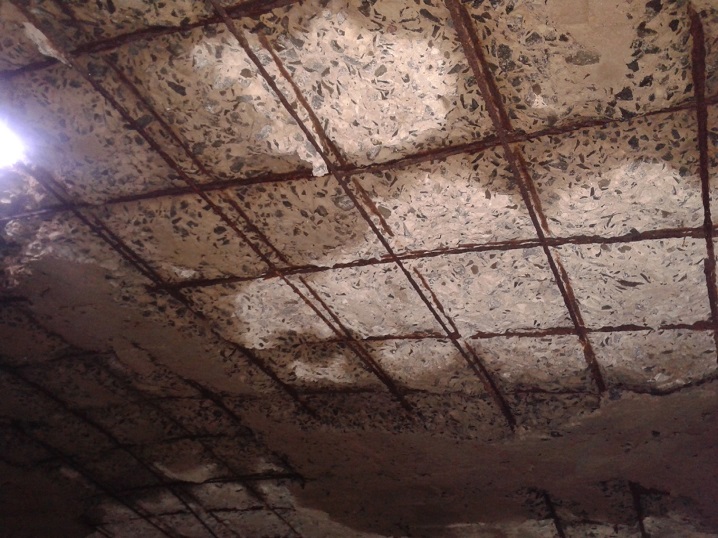
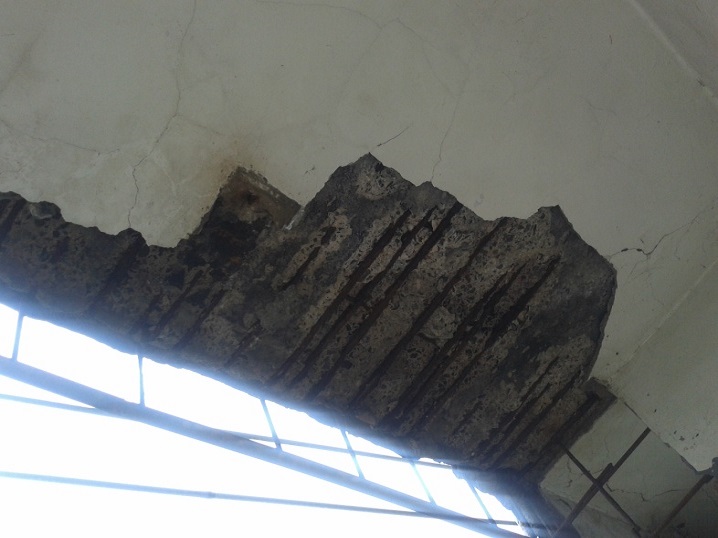
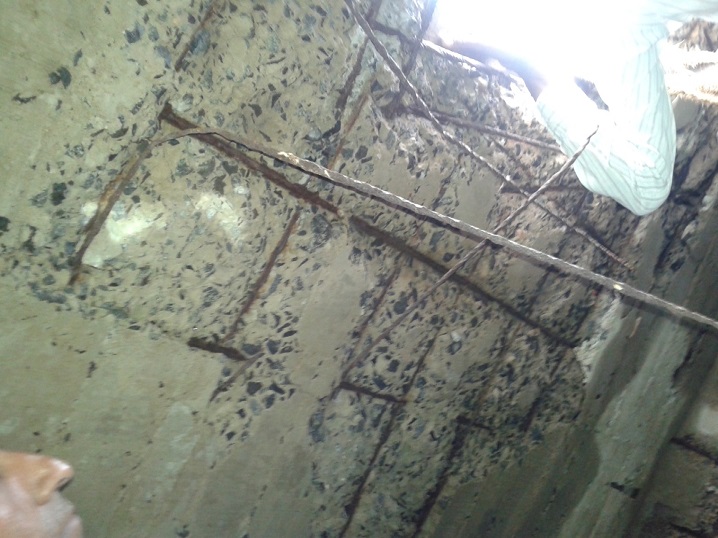
Chipping and removing existing damage area of plaster / RCC up to sound surface. Wire brush and clean the surface.
Cutting and removing the existing deteriorated reinforcement bar and replace the same with new one.
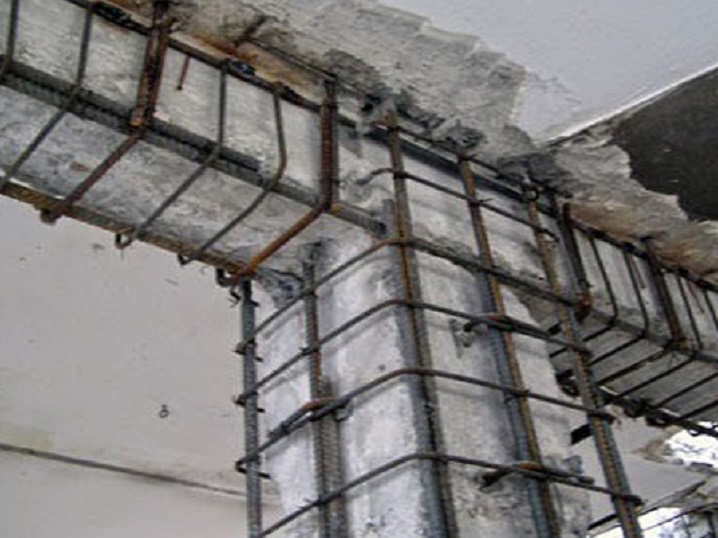
Clean the reinforcement steel and application of two coats single component corrosion- inhibiting cement mortar for protection of reinforcement rods MAPEFER 1K.
Clean the surface, remove the loose particle until the surface is solid. Pre-wetting the area and application of one coat primer PLANICRETE. Repair the area with MAPEGROUT THIXOTROPIC, non shrink fiber reinforced thixotropic mortar for concrete repair grout.
The R C members should be properly supported before chipping the spalled / loose concrete. The props provided shall be adequate to provide sufficientstructural support to the load carrying members Surface preparation All the spalled cracked concrete or any other pre-applied mortar shall be removed by chipping to expose the reinforcing bars. The concrete shall be chipped to a minimum depth of 10mm behind the reinforcing bars. The areas to be repaired shall be profiled to get rectangular or square shape with an inward tapering edge The exposed reinforcing bars should be cleaned thoroughly to remove all traces of rust, scales, etc., by using wire brush, emery paper etc. The lateral ties/stirrups shall also be cleaned in the same way. After removal of corroded portion, the diameter of the reinforcement shall be checked and compared with the drawings. As the diameter of reinforcing bars is reduced substantially (say >20%) additional bars shall be provided as per the design. This additional reinforcement shall be properly anchored to the existing concrete by providing adequate shear connectors. Weld mesh may also be provided if found necessary. Shear connectors of 8mm diameter shall be provided in holes of 14mm diameter and 75 mm deep. These shall be provided at every 500 mm c/c on all the faces of the beams in staggered form. The holes shall be cleaned with compressed air or water jet to remove all the dust etc. and then the shear connectors shall be fixed in the holes using polyester resin anchor grout The exposed and cleaned reinforcing bar shall be provided with a coat of Epoxy Zinc Primer such that the coated film will have a dry film thickness of 40 microns. The film shall be continuous especially in the regions where pitting, imperfections etc., are present on the surface of the bars. It is important that the rear portion of the bars should not be left without coating. A second coat if needed may be provided to achieve a uniform and continuous film. The additional reinforcement provided and also the shear connectors shall be coated with Epoxy Zinc Primer. The weld mesh if provided shall also be coated with Epoxy Zinc Primer. The base and hardener component of epoxy resin based bonding agent must be mixed well to get a uniform grey coloured mix. Apply the material to properly cleaned and dry concrete substrate using stiff nylon brush by scrubbing it well into the substrate. The coat should be uniform and well spread on the entire surface area of the repair patch. The mixed material must be applied before the elapse of its pot life and the new repair mortar must be applied before the elapse of overlay time. As a fully dried epoxy resin coat acts as debonding layer, the repair material should be applied whilst the bonding coat is tacky. In case the applied epoxy bond coat gets dry, an extra coat should be applied before application of repair mortar. Slurry tight and strong form work shall be provided. The shuttering for encasement shall be kept ready such that the formwork shall be placed in position and fixed such that the micro concrete can be poured into the formwork within the overlay time of the bonding agent (5 hours). Adequate supports shall be provided for the formwork. Care should be taken to ensure leak proof shuttering. Under no circumstance the slurry should flow out of the shuttering during pouring of micro concrete. It should be mixed using the appropriate water powder ratio as mentioned in the product data sheet. The mixing shall be done mechanically and under no circumstance hand mixing shall be done. Mixing shall be carried out for 3 to 5minutes to ensure that homogeneous mix is obtained without any bleeding or segregation. In hot climate ice cooled water shall be used to maintain the temperature of mixed material. If the encasing thickness is more than 100 mm, add stone aggregates up to 50 % by weight of micro concrete to the mixed micro concrete directly into the mixer hopper. The stone aggregates must be 12 mm and down and shall be clean, washed and dried. The mixing should be done for 3 minutes in mixer and then pre weighed stone aggregates into the mixer. Mix further for 2 minutes till lump free mix is obtained The shuttering from the sides of the R C members shall be removed after a period of 24 hours. However, the formwork of the soffit shall be retained and removed after 3 days. The mixer should be poured into the formwork using a suitable funnel or through a hose pipe. It must be poured from one end only. A suitable hopper / funnel arrangement shall be made at site to facilitate the pouring operations. The pouring operation shall be continuous and it shall not be stopped unless the job is completed. To achieve this sufficient mixers / drilling machines and wok force shall be arranged at site. All the repaired and encased area shall be fully cured as per standard concrete practices. Curing compound shall be used for effective curing of sides and soffits of beams. If a curing compound is applied, care shall be taken to ensure that proper surface preparation is carried out so as to remove any traces of curing compound on the surface. If this is not done, it may lead to debonding of any protective coating applied on top.
Chipping and removing the loose and deteriorated concrete, putty paint etc. from the column. Clean the surface, providing and application of one coat anticorrosion coating MAPEFER 1K if reinforcemenr rebar is visible. Fix and cover the column with stainsteel plates. Pour the gaps with shrinkage compensated free-flowing, fiber reinforced micro concrete MAPEFILL -08 / MAPEFILL – 06.
Chipping and removing the loose and deteriorated concrete, putty paint etc. from the column. Clean the surface, providing and application of one coat anticorrosion coating MAPEFER 1K if reinforcemenr rebar is visible. Repair the damage area with shrinkage compensated, fiber reinforced, thixotropic mortar for concrete reapir MAPEGROUT T-40.